
PBX for Microsoft Teams: Complete step by step integration

Microsoft Teams offers an unprecedented feature set for office communication. This integration will allow for Vodia extensions and MS Teams extensions to seamlessly communicate with each other. Additionally, MS Team members can belong to hunt groups or agent groups, along with receiving and making outbound calls all from the Vodia PBX. Employees who have no need to take advantage of utilizing MS Teams can still have a registered SIP phone, making it possible for them to still be called from an MS Teams' extension through direct routing
You can review the complete installation on youtube or follow the guide below.
Below, I will discuss how to set this up with the Vodia PBX software
You can use the “Direct Routing” feature of Office 365 (TEAMS) to integrate with the Vodia PBX, explained on Microsoft® site here:
https://docs.microsoft.com/en-US/microsoftteams/direct-routing-configure
Especially “Plan Direct Routing” and “Configure Direct Routing”. This document presents it in a single step-by-step process to present it in a simplified way for integrating with the Vodia PBX, including the steps required on the Vodia PBX side.
Pre-Requisites
-
Microsoft TEAMS, Office 365 account here
-
A domain in Office 365 with FQDN (fully qualified domain name) that you own.
-
User(s) in Office 365 with at least E3 or E5 license or license that supports direct routing. Not all users need to have that license. Free Trial available here
-
Vodia PBX software with TEAMS integration (introduced in version 64.1).
-
A domain (which is FQDN) in Vodia PBX with a valid certificate.
Vodia PBX setup for integration with TEAMS Office 365
In order for Vodia PBX to send calls to TEAMS users, you have to:
-
Create a domain in Vodia PBX with an FQDN (fully qualified domain name) that you own.
-
Create the Teams extensions in that domain
-
Create a Teams trunk in that domain
-
Create a general trunk in that domain for the trunk calls and set it accordingly
1. Create a domain in Vodia PBX
Go to the domain list. Press “Create” to add a new domain. Give it a name that is an FQDN that:
-
Resolves to the Vodia PBX.
-
The domain part of which is the same as the domain you create in the Office 365 account (explained in the TEAMS Office 365 part of this document).
-
Has a valid certificate.
Since in this example we will be creating a domain by the name of “company.com” in TEAMS done below, we can use the FQDN “pbx.company.com” for the domain name to be created in Vodia PBX (the domain part of which, i.e. “company.com”, is the same as the domain name created in TEAMS). This FQDN “pbx.company.com” should reach the Vodia PBX and will be used by TEAMS to connect to Vodia PBX, explained in TEAMS section below. It must also have a valid certificate, which can be added through the certificates section. Or if the “Let’s encrypt” setting on Vodia PBX is on, then it will be created for you automatically.
A new domain “pbx.company.com” will appear in the Vodia PBX domain list.
2. Create the Teams extensions in that domain
-
Go to the domain pbx.company.com that you created in step 1, by clicking on it
-
Go to “Extensions” under “Accounts”
-
Press “Add”
-
Enter the extension number (it must be the same as the telephone number you will give to the corresponding Teams user in Office 365 (explained in Office 365 section). That’s how the PBX will map this extension to the Teams Office 365 user. Press “Create” to create the extension.
-
The extension will appear in the list. Click on it to enter the extension settings. Under the “General” tab, change the setting “Extension feature set” to “Teams”, and save.
-
Similarly, make all the extensions, giving them the extension numbers to be mapped to the Teams Office 365 users with the same numbers.
3. Create a Teams trunk in that domain
-
Go to the domain pbx.company.com that you created in step 1, by clicking on it
-
Go to “SIP Trunks” under Trunks
-
Add a trunk by pressing the “Add” button
-
Select the provider as “Teams”
-
For “User name”, give a friendly name, say “Teams”
-
Press “Create”
-
The new “Teams” trunk will appear in the list.
-
Click on it for setup. Set the setting "Country code" to your country code.
Once you have also set up TEAMS, as explained in TEAMS section below, you should be able to make and receive calls to/from TEAMS users on this trunk. In this example, we will use the default setup (i.e. without changing anything, except the country code, on this trunk). The users (with their extension numbers) on TEAMS will act as the PBX extensions as they are mapped to the PBX extensions.
4. Create a general trunk for the trunk calls and set it up accordingly
Create a general trunk for trunk calls the same way as in step 3, except choose your SIP trunk of choice (and NOT Teams), and give it another name for the general calls. It will be used for your outgoing and incoming trunk calls, as they are normally used.
This new trunk will appear in the list. Click on it to enter. Then set it up accordingly like any trunk on the PBX.
For example, you can set it for all incoming calls going to a specific account like “Auto Attendant” or “ACD” from where they can be distributed to different extensions including the mapped Teams users etc.
Also like any trunk, the “Dial plan” is used for using this trunk for outbound calls.
TEAMS Office 365 setup for integration with Vodia PBX
-
Login to your TEAMS Office 365 account and create your domain there with FQDN that you own (e.g. company.com).
-
Then create users under that domain and assign them E3, E5 or relevant license that supports “Direct Routing”.
-
Use PowerShell to connect to your Office 365 account, using your login and password.
-
Using PowerShell, create a PSTN gateway that will connect to the Vodia PBX using the FQDN of the domain you create in Vodia PBX with a valid certificate.
-
Using PowerShell, enable the user for direct routing service by configuring the phone number and enabling enterprise voice and voicemail for the user. The user should be able to receive calls from the Vodia PBX now.
-
Using PowerShell, configure voice routing for outgoing calls to the Vodia PBX.
1. Create your domain in your Office 365 tenant
Use your browser (if not using premises installation), login to your Office 365 admin account and create your domain. In “Microsoft 365 admin center”, go to “Setup”, then press the “View” button for the “Get your custom domain set up”, then the “Manage” button. Add a domain there. Choose a domain name (e.g. company.com) that you own. Since it will be verified by Microsoft for example by having you paste a value in the TXT value field of your DNS or signing in to the account where you got the domain etc. it is important that you own the domain and can perform the verification process. Once that is done, the domain will be created and you can add users to it.
2. Create users in that domain
Now you can create users under the domain you just created in step 1 above. Again, in “Microsoft 365 admin center”, go “Active users” under “Users” and “Add a user”. Give the first and last name of the user (say “John Smith”) and under username give a unique name that will be his/her email, but make sure to choose the domain you created above for the domain part of the username (company.com in this example) and not the default company.onmicrosoft.com or any other *.onmicrosoft.com. That way the user will reside in the domain you just created in step 1 above (in this example say: js@company.com).
3. Use PowerShell to Connect to your Office 365 account
- In the powershell cmd type in: Install-Module MicrosoftTeams to install the Teams module.
It has been explained on the Microsoft site here
Just the portion “Connect using a Skype for Business Online administrator account name and password” should be enough unless you want to do more.
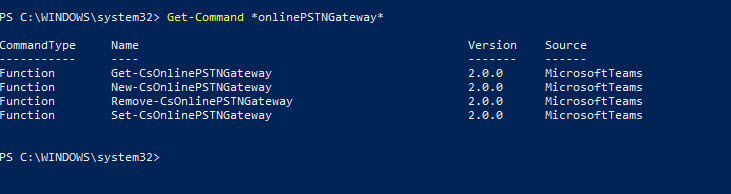
4. Create a PSTN gateway that will connect to the Vodia PBX
Before you use PowerShell, make sure it is the right one and connected to the right account as you did in step 3 above. To confirm that step 3 was done correctly use the command:
Get-Command *onlinePSTNGateway*
Your command will return the four functions shown here that will let you manage the SBC.
CommandTypeNameVersionSource
FunctionGet-CsOnlinePSTNGateway1.0tmp_v5fiu1no.wxt
FunctionNew-CsOnlinePSTNGateway1.0tmp_v5fiu1no.wxt
FunctionRemove-CsOnlinePSTNGateway1.0tmp_v5fiu1no.wxt
FunctionSet-CsOnlinePSTNGateway1.0tmp_v5fiu1no.wxt
Using PowerShell, create a PSTN gateway that will connect to the Vodia PBX using the FQDN of the domain you create in Vodia PBX with a valid certificate.
The domain portion of this FQDN must match the domain registered in your tenant as in step 1 above (e.g. it can be: pbx.company.com, since the domain you created was company.com). It is also important that there is an Office 365 user in that domain (as you did in step 2 above, a user in company.com) and an assigned E3 or E5 license. If not, you will receive an error: Can not use the “pbx.company.com” domain as it is not configured for this tenant.
This FQDN (say pbx.company.com) must resolve to a reachable IP of the Vodia PBX. Also, this FQDN (pbx.company.com in this example) must be a domain in Vodia PBX. Creating a domain in Vodia PBX is explained in the Vodia PBX section and you must make sure that a DNS A record is made for that domain (e.g. pbx.company.com) that will reach the Vodia PBX. Also, a valid certificate must be added in the Vodia PBX for this domain. Fortunately, it is very easy to get a valid certificate, if the “Let’s Encrypt” setting is on. All you have to do is create the domain and a Let’s Encrypt certificate will be added for it automatically.
PowerShell command example to create the PSTN gateway:
New-CsOnlinePSTNGateway -Identity pbx.company.com -Enabled $true -SipSignalingPort 5061 -MaxConcurrentSessions 100
Of course, use your own domain.
Returns:
Identity : pbx.company.com Fqdn : pbx.company.com SipSignallingPort : 5061 FailoverTimeSeconds : 10 ForwardCallHistory : False ForwardPai : False SendSipOptions : True MaxConcurrentSessions : 100 Enabled : True
You can check this gateway parameters at any time with:
Get-CsOnlinePSTNGateway -Identity pbx.company.com
Returns:
Identity : pbx.company.com Fqdn : pbx.company.com SipSignallingPort : 5061 CodecPriority : SILKWB,SILKNB,PCMU,PCMA ExcludedCodecs : FailoverTimeSeconds : 10 ForwardCallHistory : False ForwardPai : False SendSipOptions : True MaxConcurrentSessions : 100 Enabled : True
5. Enable the user for direct routing service
Direct Routing requires the user to be homed on Skype for Business Online. You can check this by looking at the RegistrarPool parameter. It needs to have a value in the infra.lync.com domain.
PowerShell command:
Get-CsOnlineUser -Identity "<User name>" | fl RegistrarPool
For our example:
Get-CsOnlineUser -Identity "John Smith" | fl RegistrarPool
Using PowerShell, enable the user for direct routing service by configuring the phone number and enabling enterprise voice and voicemail for the user.
Set-CsUser -Identity "<User name>" -EnterpriseVoiceEnabled $true -HostedVoiceMail $true -OnPremLineURI tel:<E.164 phone number>
For our example:
Set-CsUser -Identity "John Smith" -OnPremLineURI tel:4002 -EnterpriseVoiceEnabled $true -HostedVoiceMail $true
OR
Set-CsUser -Identity "js@company.com" -OnPremLineURI tel:4002 -EnterpriseVoiceEnabled $true -HostedVoiceMail $true
Notice, the number is a 4 digit number for our example, but it could be a full E.164 number. For this example, we want to use the users as extensions (and here 4002 is the extension for this user) which can connect and can be connected as an extension between TEAMS and Vodia PBX. PSTN or SIP trunk inbound and outbound calls can be handled by the Vodia PBX trunk just like any PBX and users on TEAMS can act as extensions of the PBX. But you can easily use other setups and scenarios and assign the full E.164 numbers (with country code) to the users.
Note: It can take some time between creating a user in Teams and being able to change its setting here with "Set-CsUser", so you may have to wait an hour or two if it gives errors like the user does not exist and you have made sure that the user email (or name) is correct.
The user should be able to receive calls from the Vodia PBX now, either from extensions on Vodia PBX itself or from PSTN and SIP trunks (setup within Vodia PBX), as the case may be.
6. Configure voice routing for outgoing calls to the Vodia PBX.
Now you can configure the rules as to when to use the PSTN gateway setup in step 4 above to route the call to Vodia PBX.
As explained in the Microsoft document, Microsoft Phone System has a routing mechanism that allows a call to be sent to a specific SBC based on:
-
Called number pattern
-
Called number pattern + Specific User who makes the call
Call routing involves:
-
Online PSTN Gateway: It connects to the SBC or PBX (in this case, Vodia PBX). It also stores the configuration that is applied when a call is placed via the SBC, such as forward P-Asserted-Identity (PAI) or Preferred Codecs. It is used by Voice Routes.
-
Voice Route: It uses Online PSTN Gateways to use for calls where calling number matches the pattern.
-
PSTN Usage: It uses Voice Routes and other PSTN Usages. Different Voice Routing Policies can use it.
-
Voice Routing Policy: It uses PSTN Usages. It can be assigned to a user or to multiple users.
In summary:
User -> Voice routing policy -> PSTN usage -> Voice route -> PSTN gateway
In our example, since we use the user as a PBX extension of Vodia, we want the call to first go there and use the dial plans in Vodia PBX for routing calls. There can be other scenarios easily implemented as well. For this simple one, let’s create:
John Smith (User)-> Policy1 (Voice policy) -> Usage1 (PSTN usage) -> pbx.company.com (PSTN gateway)
Let’s create the usage first as it is going to be used in the route:
Set-CsOnlinePstnUsage -Identity Global -Usage @{Add="Usage1"}
To find out available usages, use:
Get-CSOnlinePSTNUsage
Let’s create the route using the Vodia PSTN gateway and the above usage:
New-CsOnlineVoiceRoute -Identity "Route1" -NumberPattern "^\+(\d{4})|^(\d{4})" -OnlinePstnGatewayList pbx.company.com -Priority 1 -OnlinePstnUsages "Usage1"
As you can see the command creates a route “Route1” where TEAMS will pass the call to PSTN gateway pbx.company.com (a domain in Vodia PBX) if the dialed number has at least 4 numbers (that is of course based on our example here where we want to give each user a 4 digit extension, but it is up to your setup), with or without a + sign. That way, you could dial a 4 digit extension or an E.164 number with country code and + sign.
Of course, multiple routes can be created with different priorities.
To find out different routes, use:
Get-CsOnlineVoiceRoute
Let’s create a voice policy using the same usage to which our PSTN gateway is linked above:
New-CsOnlineVoiceRoutingPolicy "Policy1" -OnlinePstnUsages "Usage1"
The result for the example:
Identity : Tag:Policy1 OnlinePstnUsages : {Usage1} Description : RouteType : BYOT
You can, of course, create a policy with several PSTN Usages, but we will keep it simple and to the point regarding our example.
Let’s grant our user John Smith our voice policy:
Grant-CsOnlineVoiceRoutingPolicy -Identity "js@company.com" -PolicyName "Policy1"
You can check the policy assignment with this command:
Get-CsOnlineUser "js@company.com" | select OnlineVoiceRoutingPolicy
Now the outbound dialing policy and routing is complete and John Smith can call out. In this example, that outbound call will end up in your Vodia PBX domain pbx.company.com.
In our example, we could set up your domain in Vodia PBX (explained in Vodia PBX section) so that:
-
If that extension (4 digits in this case) exists in your Vodia PBX domain and registered, it will be called from your Office 365 user whether its a SIP desktop phone registered to your Vodia domain, Vodia desktop app, Vodia web app or Vodia smartphone app.
-
If that extension does not exist (say an E.164 10 digit number etc.), then Vodia will route the call to a PSTN gateway or SIP trunk so that call can go out.
Microsoft Teams Webinar slide presentation